The Actionstep Gmail add-on allows Gmail users to save and assign emails to their Actionstep matters. Once the email is assigned, the email message and attachments become available in the corresponding matter in Actionstep. Additionally, the add-on allows you to access basic information on parties, file notes, and tasks while viewing the email in Gmail. It also provides links to access the information in your Actionstep system directly.
Before you begin:
- The Google add-on must be installed for your account. For complete instructions, see Installing the Gmail add-on.
- You must also have your Gmail account set up in Actionstep. For complete instructions, see Setting Up Personal Email Mailboxes or Setting Up a System Email Mailbox (Admin) and choose the Gmail option.
Accessing the Gmail Add-On
To access the add-on and connect it to your Actionstep:
- Sign in to Gmail and click the Actionstep icon in the toolbar on the right side of your Gmail page.

- Select an email in your email list.
- If prompted to sign in to Actionstep, click Login.

- On the Actionstep sign-in page, use your preferred sign-in method and complete the sign-in process. (If you have access to multiple Actionstep databases, this may include selecting the database you need to access.)
Gmail is then linked to your firm's Actionstep database.
Associating an Email With a Matter
To search for and assign an email to a specific matter:
- Enter your search text in the Search for Matters field.NOTES:
• Based on the From address of the email, matters may be automatically suggested.
• Searches will search the matter name, matter ID, or file reference for the text you enter. - In the list of results that appears, select the matter you want to assign the email to.
 Once assigned, information about the matter is displayed.
- While viewing this information, complete any of the following tasks:
- If attachments were included in the email, click Organize Attachments and then choose where you want to save the attachments. You can move all attachments at once or move selected attachments individually. For more help, see Organizing Attachments, below.
- Click Parties to view the parties associated with the matter. You can then click a party name to view their contact card or click the Email icon next to their name to draft and send an email to them. You can also click the launch icon next to Participants to view the Parties page of the assigned matter.
- Click File Notes to review any notes associated with this matter. Click the launch icon next to File Notes to view the File Notes page of the assigned matter.
- Click Tasks to view tasks associated with this matter. Use the drop-down list to filter the task list, and toggle Show Completed Tasks to also included any tasks that have been finished in the list.
 You can also click the launch icon next to Tasks to view the Tasks page of the assigned matter.
 - In the Primary Participants list, click the email icon next to any listed participant to send them an email.
- Click View in Actionstep to open this matter in Actionstep.
- If you select any of the links above to drill down into the information, click the back arrow to return to the main matter information screen or the default add-on screen.

Completing Other Google Add-On Tasks
The following options are available by clicking the More actions icon:

- Organize Attachments: If you're viewing an email with attachments, click this to choose where the attachments are saved. (See Organizing Attachments, below, for more information.)
- Unassign: Click this to unassign the email from the matter in Actionstep. Once you click this option, you can choose to Delete Email from Actionstep. This removes the copy of the email stored in the matter. It does not delete the copy of the email in Gmail, however. (Click Unassign to complete the removal.)
- Settings: Click this to review your basic information, organization, and version of the add-on you're using.
- Logout: Click this to sign out of the add-on.
- Refresh: Click this to update the panel with the most up-to-date information in Actionstep. This can be useful when there are changes currently being made to records in Actionstep.
- Manage add-on: Displays the Google Workspace Marketplace page where you can view information about or uninstall the add-on.
Organizing Attachments
If an email has attachments, you can organize them into the different document folders available for the matter.
To do this:
- View the Actionstep add-on pane and assign the email to a matter. (See the instructions in Searching for a Matter to Associate an Email With, above, for instructions.)
- While viewing the matter information in the add-on pane, do one of the following:
- Click the More actions icon (the three dots icon) and choose Organize Attachments from the list that appears.
- Under Email Assigned, click Organize Attachments.
 The Organize Attachments panel is displayed.
- Click the Choose folder to move files to drop-down list and choose the folder you want to move the attachments to.

- Do one of the following:
- To move all attachments at once, click Move all files.

- To move only specific attachments, toggle those files and click Move selected.
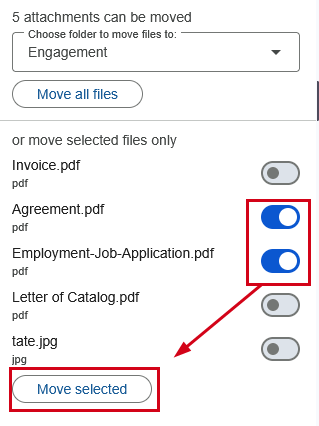
The attachments are moved to the folder you selected.
- To move all attachments at once, click Move all files.
Assigning Emails to Multiple Matters
When an email is assigned to a matter, a copy of the email is stored in the matter. You can associate the email with other matters if you need to.
To do this:
- View the matter the email is currently associated with. (See Editing a Matter for help.)
- Hover over the Comms menu and choose Inbox. The Inbox is displayed.
- Find the email you want to associate with another matter and click it to open it.
- Click Add Association. The Set Associations window appears.
- Enter the name or ID of the matter you want to add the email to in the search box and then select it.
 The matter is added to the list.
 - Click Save to save your changes.
Finding Emails in Actionstep
You can view the emails you assigned to Actionstep from Gmail by clicking Comms in the main menu and going to Matter Email > Inbox.

You can also view emails by viewing the matter and clicking the Comms menu icon and choosing Inbox.
Additional Resources:
Was this article helpful?
That’s Great!
Thank you for your feedback
Sorry! We couldn't be helpful
Thank you for your feedback
Feedback sent
We appreciate your effort and will try to fix the article